How to use AppBox with Jenkins and GitLab for CI and CD?
Before beginning to this article make sure Jenkins Server and AppBox is already setup and running. This article covers how to use Jenkins and AppBox for Build Automation and Deployment of Development, Ad-Hoc and In-house (Enterprise) iOS applications directly to the devices from your Dropbox account.
1. Setup Xcode Project for AppBox
1.1 AppBox Project setting plist
Add a appbox.plist file in your project main directory. This file will contains the build information of your project. Here the sample of appbox.plist
<?xml version="1.0" encoding="UTF-8"?>
<!DOCTYPE plist PUBLIC "-//Apple//DTD PLIST 1.0//EN" "http://www.apple.com/DTDs/PropertyList-1.0.dtd">
<plist version="1.0">
<dict>
    <key>project</key>
    <string>TestJenkins.xcodeproj</string>
    <key>scheme</key>
    <string>TestJenkins</string>
    <key>buildtype</key>
    <string>development</string>
    <key>teamid</key>
    <string>4F7SW76LL6</string>
    <key>keepsamelink</key>
    <true/>
    <key>dropboxfoldername</key>
    <string></string>
    <key>email</key>
    <string>user@example.com</string>
    <key>personalmessage</key>
    <string>Test Build</string>
</dict>
</plist>
appBox.plist key description -
- project (string, required) — Name of the Xcode project/workspace file. Project must be manage signing automatically.
- scheme (string, required) — Name of the scheme to build. Project scheme must be shared.
- buildtype (string, required) — "ad-hoc", "enterprise", "app-store" or "development"
- teamid (string, required) — Development TeamId.
- email (string, required) — mail build share url
- personalmessage (string, optional) — Attach personal message in email
- keepsamelink (boolean, optional) — true/false (read more)
- dropboxfoldername (string, optional) — Custom Dropbox Folder Name (By default will be bundle identifier).
- itcemail (string, optional) - iTunesConnect/AppStore Connect email (if buildtype is app-store).
1.2 Private keys and Provisioning Profiles
All your private keys and provisioning profile should be in a directory called cert inside project main directory. Directory cert will include certificates and provisioning profile and plist with name appbox.plist Note — All private key must have some valid password.
<?xml version="1.0" encoding="UTF-8"?>
<!DOCTYPE plist PUBLIC "-//Apple//DTD PLIST 1.0//EN" "http://www.apple.com/DTDs/PropertyList-1.0.dtd">
<plist version="1.0">
<array>
    <dict>
        <key>name</key>
        <string>Certificates.p12</string>
        <key>password</key>
        <string>password</string>
    </dict>
    <dict>
        <key>name</key>
        <string>Test_Jenkins_Developer.mobileprovision</string>
    </dict>
    <dict>
        <key>name</key>
        <string>Test_Jenkins_InHouse.mobileprovision</string>
    </dict>
</array>
</plist>
You can download demo appbox.plist and cert/appbox.plist from here.
1.3 Project Directory Structure
After full setup, your project directory will be look like this -
ProjectName (This is  your project main directory)
|- ProjectName
|- Project.xcodeproj
|- Project.xcworkspace
|- appbox.plist (Appbox project setting file)
|- cert (Appbox project certificate directory)
|   |- appbox.plist (Appbox certificate information file)
|   |- Cetificates1.p12
|   |- Cetificates2.p12
|   |- Project-adhoc.mobileprovision
|   |- Project-enterprice.mobileprovision
|   |- Project-appstore.mobileprovision
|- ProjectTests (If any)
2. Setup Jenkins Project and Configurations
2.1 Create Project
Create a new Jenkins project using freestyle option.
Jenkins → New Item → Enter project name → Freestyle project → Click OK.

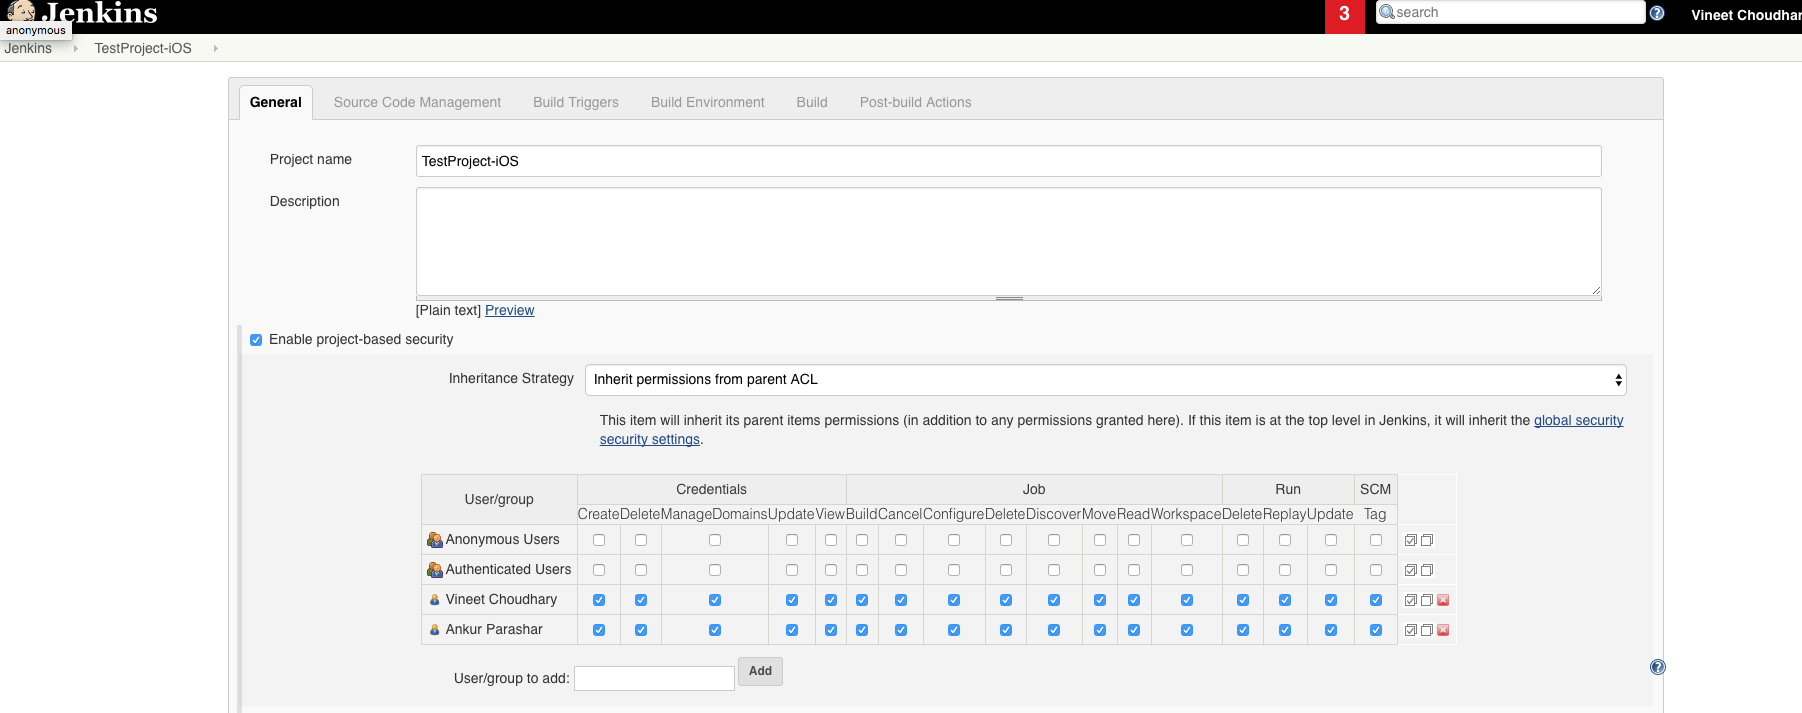
2.2 General Configurations
In general configurations, you can Enable project-based security. In which you can manage the different project member with their access level.
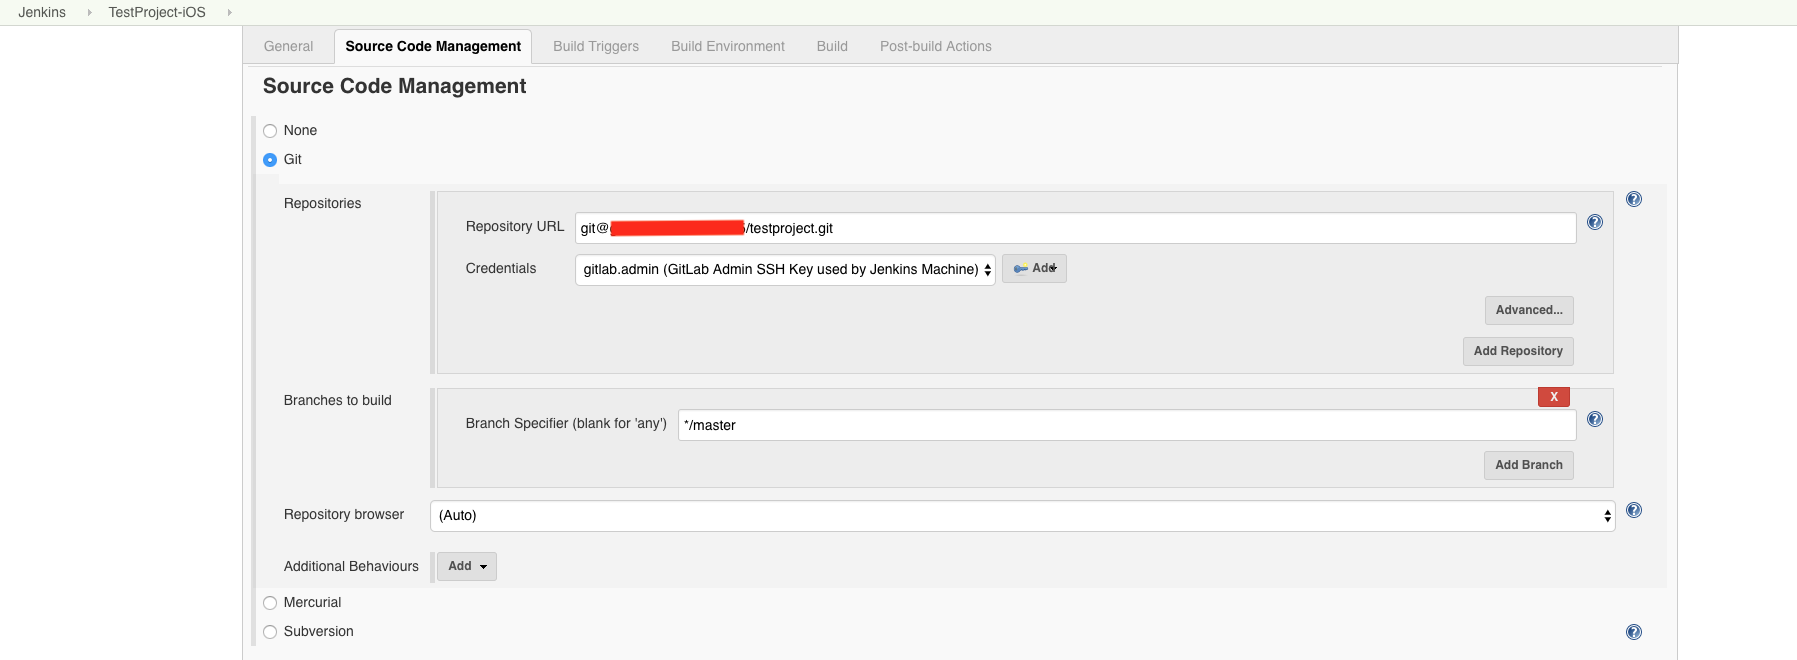
2.3 Source Code Management
Check Git in the section Source Code Management and enter the url of the repository and select the right credentials.
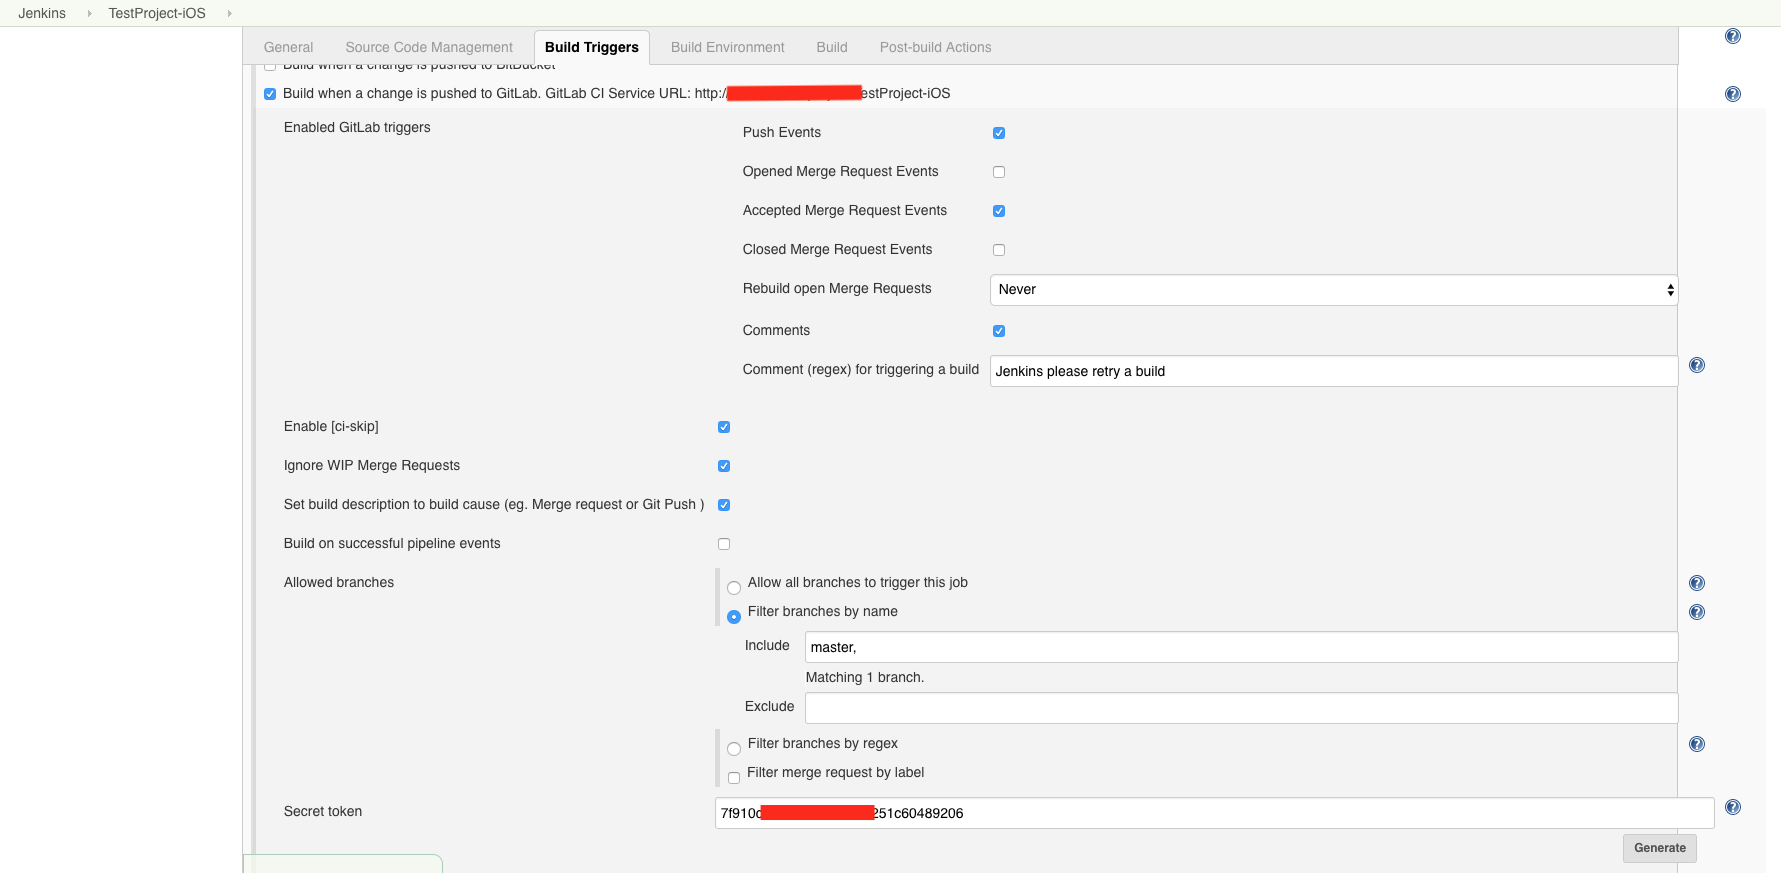
2.4 Build Triggers
In Build triggers section check the option to Build when a change is pushed to GitLab. This will trigger the build when a change is pushed to Gitlab. There’s a small bug with the plugin key generation so Save or Apply the changes to the job first, then under Advanced generate a key. Gitlab requires this key. Here you can also apply the filter by branches name.
2.5 Connect GitLab And Jenkins
In this setup you’ll setup your GitLab repository for Jenkins, so that Jenkins is automatically notified when there’s a new commit to the GitLab repository and can commit successful builds back to it. To do this:
2.5.1 Open GitLab and browse to the GitLab page for the project. 2.5.2 Go to the Project Integration page via Settings → Integrations 2.5.3 Configure a new Jenkins webhook as follows: — In the URL field, enter the Jenkins Gitlab CI service URL from Step 2.4 . — In the Secret Token field, enter the Secret token form Setup 2.4. — In the list of triggers, select the events that should trigger a new Jenkins build, such as new Push Events or Accept Merge Request Events. — Click Add Webhook.

2.6 Build
In Build step, we need to execute AppBox with current workspace. So, add the following command
/Applications/AppBox.app/Contents/MacOS/AppBox build=$WORKSPACE
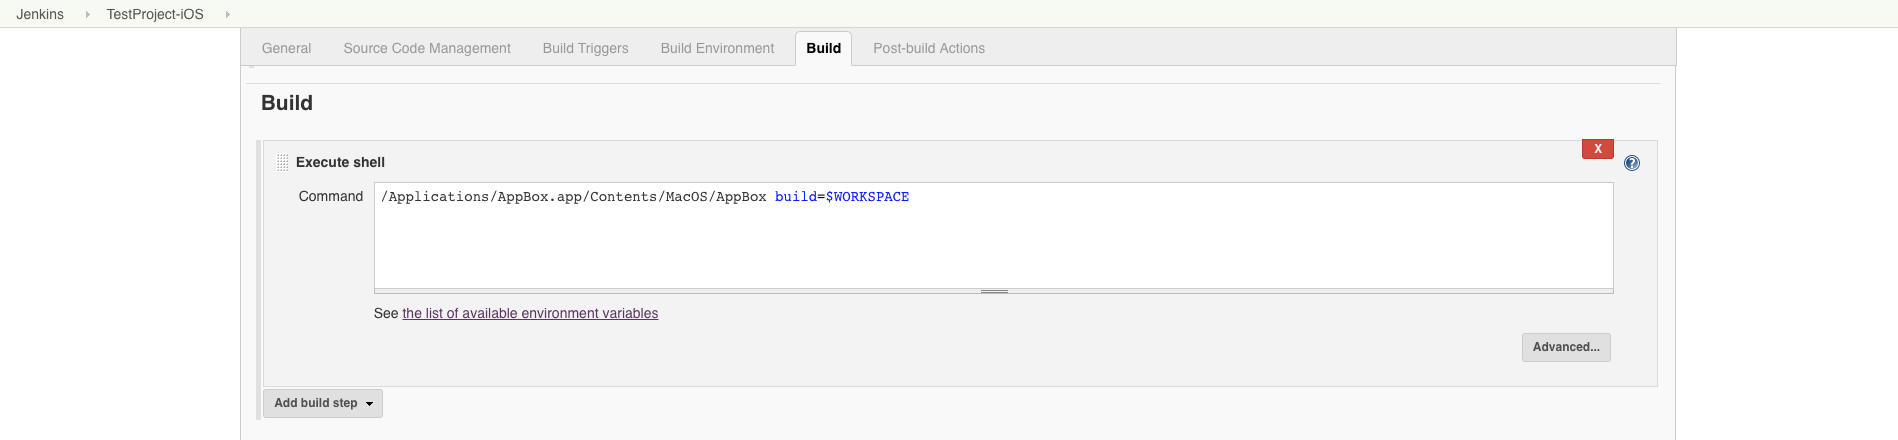
Make sure AppBox must be available in your Applications directory.
build — Always will be $WORKSPACE (required) scheme — here you can override the scheme name from appbox.plist in step 1.1 (optional) buildtype — here you can override the buildtype from appbox.plist in step 1.1 (optional)
Example
/Applications/AppBox.app/Contents/MacOS/AppBox build=$WORKSPACE scheme=ProjectLIVE buildtype=app-store
2.7 Post-build Actions
Finally, in the Post-build Actions step we need to Publish build status to GitLab commit and Add note with build status on Gitlab merge request. This enables the feedback and gives us pretty indicators in GitLab commit and merge request.

Your Continuous Integration (CI) and Continuous Delivery (CD) with Jenkins and AppBox is now ready for use!